Affinity Purification and On-column Cleavage (NEB #S6651)
The following protocol can be employed to purify an intein-chitin binding domain (CBD) tagged fusion protein from a crude cell extract using chitin resin (S6651) (please consult the IMPACT manual for more details).
Protocol
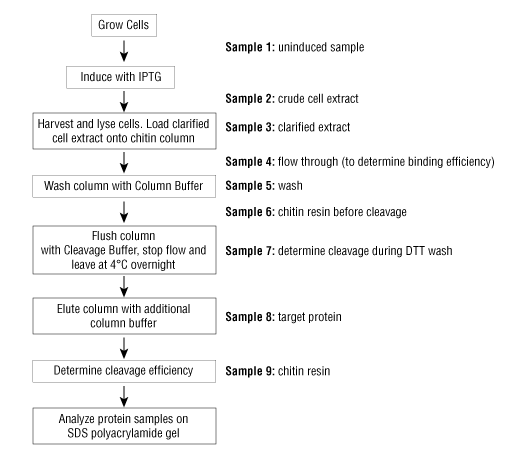
Note: Remove samples for SDS-PAGE gel analysis as indicated throughout the protocol, sample numbers are in reference to Figure 1 below. Once the purification is complete, standard SDS-PAGE analysis of each fraction will be performed to visualize the efficiency of the purification.
Preparation of Chitin Column
- To purify 1L of culture, pack a column with 20 mL chitin bead slurry (10 ml of chitin bead bed volume). Adjust the amount of beads according to expression level.
- Wash the chitin column with >5 column volumes of column buffer (20 mM Tris-HCl, pH 8.5, 0.5 M NaCl, 1 mM EDTA, 0.05% Tween® 20).
Note: the column buffer composition can be adjusted for target protein stability; typical recommendations:
20 mM HEPES or Tris-HCl, pH 8.0 - 8.5
500 mM NaCl (optimal range is 50 – 1,000 mM NaCl)
1 mM EDTA (optional)
Nonionic detergents (0.1–0.5% Triton X-100 or 0.1–0.2% Tween 20)
Protease inhibitors [e.g., PMSF (20 µM)], if necessary
If the target protein is sensitive to oxidation, 1 mM of TCEP [tris-(2-carboxyethyl)phosphine] or TCCP [tris-(2-cyanoethyl)phosphine] may be used.
Loading the Clarified Cell Extract
- Remove and retain a 10 µL aliquot of the clarified extract (load) for SDS-PAGE analysis, (Sample 3, Figure 1)
- Load the clarified extract onto the chitin column at a flow rate no faster than 0.5-1 ml/min, while collecting the flow through (FT).
- Remove a 10 µL aliquot of the FT for SDS-PAGE analysis (Sample 4, Figure 1).
Note: comparison of the FT and the clarified cell extract (load) will indicate the binding efficiency of the fusion protein to the chitin resin. If a large amount of the fusion protein is present in the flow through you may need to increase the amount of resin or decrease the flow rate when loading.
Washing the Chitin Column
Due to the high affinity of the CBD for the chitin beads, a higher flow rate (e.g., 2 ml/min) and stringent wash conditions [high salt concentration (0.5-1 M NaCl) and/or non-ionic detergents] can be used to reduce non-specific binding of other E. coli proteins.
- Wash the chitin resin with ≥20 column volumes of column buffer; collect the wash.
- Remove a 10 µL aliquot of the wash for SDS-PAGE analysis, (Sample 5, Figure 1).
Induction of On-column Cleavage
- To release the target protein, on-column cleavage is induced by a thiol reagent. Before adding the thiol reagent, remove and retain a 100 μL aliquot of chitin resin to visualize the amount of protein immobilized via SDS-PAGE analysis, (Sample 6, Figure 1).
- Induction of the on-column cleavage is conducted by quickly washing the column with 3 column volumes of the Cleavage Buffer (column buffer supplemented with 50 mM DTT), to evenly distribute thiols throughout the column. Retain the wash. Remove and retain a 10 µL aliquot of the cleavage buffer/DTT wash for SDS-PAGE analysis, (Sample 7, Figure 1).
- Stop the column flow and leave at 4-23°C for 16-40 hours.
Note: Several factors affect the cleavage efficiency and thus the final yield: (i) amino acid residue(s) at the cleavage site; (ii) temperature of the cleavage reaction; (iii) duration of the cleavage reaction; (iv) pH of the cleavage buffer. In general, if a large amount of the precursor still remains uncleaved (via SDS-PAGE analysis), continue incubation of the column for an additional 12-24 hours before conducting a second elution.
Please consult the IMPACT Manual for further optimization/troubleshooting with regards to cleavage efficiency.
Elution of the Target Protein
- Elute the target protein from the chitin resin using 2-4 column volumes of Column Buffer. The intein-CBD tag will remain bound to the resin, while the target protein elutes. Collect fraction sizes of approximately one third of the column bed volume. This typically results in the elution of the target protein within the first few fractions.
- Remove and retain a 10 µL aliquot of the elution fraction(s) to be analyzed via SDS-PAGE, (Sample 8, Figure 1).
Stripping and Regeneration of the Chitin Resin
Uncleaved fusion protein and the intein-tag remain bound to the chitin resin during elution and can be stripped from the resin using a stripping solution (either column buffer supplemented with 1% SDS or 0.3 M NaOH), followed by equilibration in a storage solution for regeneration and re-use.
Note: if using the SDS based stripping solution, one should perform column stripping at room temperature to prevent the precipitation of the SDS.
The chitin resin can be regenerated 4-5 times using the following protocol:
- Prior to stripping the chitin resin, remove a 100 µL aliquot of the resin for SDS-PAGE analysis (Sample 9, Figure 1).
- Wash the chitin resin with 3 column volumes of stripping solution. Stop the flow of the column and do not let the resin run dry.
- Allow the chitin resin to soak for 30 minutes in the stripping solution. Wash with an additional 7 column volumes of stripping solution.
- Rinse with 20 column volumes of water.
- Equilibrate the resin with 5 column volumes of storage solution (either 20% ethanol or column buffer containing 0.02% sodium azide).
- The regenerated resin should be stored at 4°C.
SDS-PAGE Analysis
For SDS-PAGE analysis of retained samples we recommend using NEB# B7703, Blue Loading Buffer Pack, as follows:
- Add 1/10 volume of the 30X DTT solution to 1 volume 3X Blue Loading Buffer.
- For samples that do not contain resin, add 1/2 volume of the above mix to the retained sample. (e.g. a 10 µL retained sample requires 5 µL of the mix). For samples that contain resin, combine 2X the volume of the above mix with the retained sample (e.g. a 100 µL retained sample of resin requires 200 µL of the mix).
- Incubate at >95°C for 5 minutes to denature the protein.
- Spin for 30 seconds in a microfuge to remove precipitated material (or sediment the resin samples).
- Load 5-15 µL onto the gel. Load volume will require optimization based on protein quantity present, to avoid under/over-loading the gel.
- Run the gel according to manufacturer’s specifications.